
Details on the USB-GDROM device. Installation, usage and comparison to the popular GDEMU. Preparing a drive and other modifications to consider.
USB-GDROM and ODE devices
Firstly, whats an ODE? It stands for Optical Disc Emulation. ODE devices are designed to be a replacement for ageing or failed Optical storage devices like CD-Rom and in the case of Dreamcast, it’s GD-Rom drive. Although the Dreamcasts GD-ROM is quite reliable and easy obtained second hand, It might not always remain so. Having an ODE like the USB-GDROM mean you no longer need to reply on the drive reading the original disc based games. The game files, in the form of GDI can be loaded and accessed directly. As its not longer needed, the GD-ROM drive can be removed altogether
There is one more option that allows you to keep your GD-Rom installed and retain the ability to load games from GD or Hard Drive. It requires more modding than simply replacing the GD drive. This is called Dreamshell. I covered this system here some time ago.
USB-GDROM vs GDEMU
Currently there are two available ODE products for Dreamcast. The GD-GDROM, and the GDEMU. Both devices have their advantages and disadvantages. Lets take a quick look at them;
GDEMU: The GDEMU is the cheaper of the 2 devices at $130. Its also the hardest to get hold of as the developer does not have a sales page an only produces a small number of the devices at any time. GDEMU runs Dreamcast GDI/CDI files from an SD card, but only officially supports up to 32GB cards (unofficially up to 256GB have been reported to work) The larger SD cards also seem to take longer to initialise when booting the system. GDEMU does have a nice menu and the ability to display game disc artwork, but as a down side requires more time to correctly order and organise the folder and file structure on the SD card. There is a helpful application that makes this easier, but its not exactly drag and drop. GDEMU only supports VA1 model Dreamcast’s so check your device. Home page for GDEMU. Cheap clones are now available but I cannot recommend then.
USB-GDROM: This device is more costly, but perhaps easier to order directly from the developers web page. USB-GDROM supports USB devices up to 2TB. You can hold the entire Dreamcast collection easily on a single USB stick or HDD. Its easy to transfer files and has no restrictions on folder or file names and even has LongFileName support. One downside, current GUI is very basic looking. USB-GDROM supports only GDI and CDI formats. It also supports both VA0 and VA1 Dreamcast revisions making it more likely to work on your console. Neither USB-GDROM or GDEMU support VA2 Dreamcast models.
USB-GDROM Installation
I placed an order for the USB-GDROM and received it in the post a few week later. I didn’t receive any paperwork or instructions with my unit, not sure if other people have with theirs.
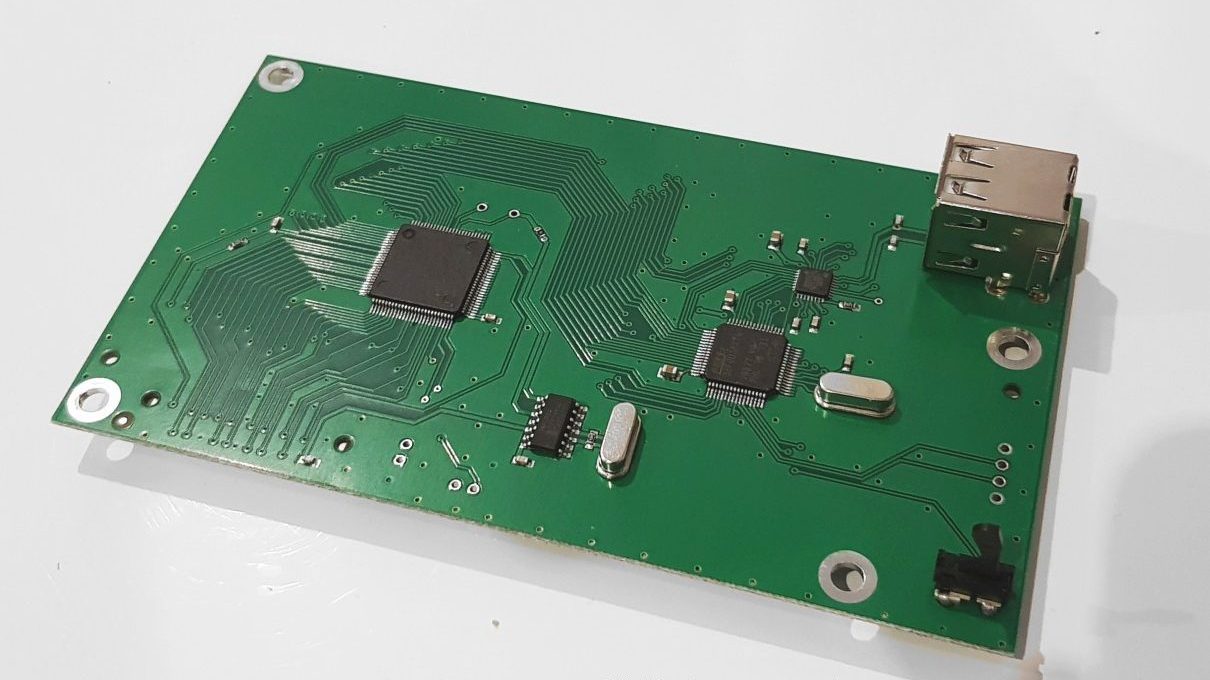
The board is rather plane looking, it has a couple of custom chips and a lot fewer components that I would have expected. On the top side, you can see the USB ports and the lid detection switch.
")
|
")
|
")
|
On the Under side we have a connection port to motherboard.
For this installation I selected a stock PAL Dreamcast with no prior modifications.
")
|
")
|
Installation is as simple as opening the console, removing the GD-Rom, and pressing the USB-GDROM into place. USB-GDROM will work like this but a more compliant installation involved removing the metal place from the top section of the old GD-Rom and screwing it to the USB-GDROM board. This makes a much more robust installation when screwed down.
")
|
")
|
Drive Setup
Now to prepare a USB drive. As mentioned you can use almost any USB device that will fit in your Dreamcast. For this article, I have a 16Gb Toshiba USB Stick, and a 1Tb WD10JPVX SATA HDD, connected with a Sabrent USB3.0 adapter.
Firstly you need to Format your drive to FAT32 with 64kb cluster size. You will also need to make sure your drive uses MBR partition type and not GPT. This caught me out initially.
I used MiniTool Partition Wizzard on my Windows 10 PC, but there are thousands of programs that can manage disks on any operating system you like.

|
Now just copy over you game .GDI or .CDI files. You can setup any folder structure for games you like, with any folder names you want, but to keep things organised the developer has included sets of folders you can use on his site. One thing you may find is that transfers are slower than you may expect when using FAT32 devices compared to NTFS. I averaged about 14mbps to the SATA HDD even when connected to a USB 3 port on the computer.

|

|
Usage Basics
Ok, so we have the USB-GDROM installed, and a USB stick/HDD with games.
")
|
Power On!
You’ll be greeted with the Dreamcast logo as normal when powering the console. Then the USB-GDROM will load its boot menu. As I mentioned at the beginning, the menu is simplistic and straightforward. you don’t get any fancy artwork or graphics here.

|
Just select a folder containing the game GDI files and press the A button. Region Free mode is on by default so any region game will run.
In no time at all you’ll be playing the selected game.
To get back to the selection menu, just open the lid, or reset the console if you have a reset mod.
Other Notes
I’ve also seen mentioned in a few places that the removal of the GD-ROM drive causes an overheating problem in the power supply. This can be caused because the 12v regulation system in the PSU does not have enough load causing an over-run to 14v and generate more heat. Two solutions are avalible. Firstly by putting a 300R (ohm) resistor between the 12v and ground rails on the power supply. Secondly by removing the 12v regulator altogether.
Removal of the regulator is usually the best way to go, except it will remove all 12v lines from the system including the AV port. You might find that RGB video stops displaying over SCART. This seems to depend on the RGB cable its self, and you may not have a problem if its wired to use 5v for video blanking.
Another potential problem is airflow. The original GD-Rom was shaped to fill the space in the top of the case and allow the fan to draw air from the PSU around the drive. Without the drive present airflow is not as effective. I’d recommend getting a 3D Printed tray insert for the USB-GDROM.
You can always replace the old PSU with a new DreamPSU which will run cooler, and is more efficient than the original power supply.
Any down sides?
Only as I mentioned, you might have to take extra steps to keep the original power supply from overheating. That and the original GD-Rom drive needs removing so you cannot load a disc game on the console at all anymore. Due to the Dreamcasts compact design I cannot see any way of having both installed if it was supported. Uploading games to the USB drive can be slow as it only supports FAT32 filesystem.
Worth the cost?
USB-GDROM is not cheap. Neither is the official GDEMU for that matter. For my money, I’d recommend the USB-GDROM. You have a standardised USB connector, easy game uploading and the ability to hold your entire Dreamcast library on one drive. Menus are faster and the compatibility is spot on. You can also use it on any VA0/1 Dreamcast.
In conclusion, Yes its worth the cost, and a great alternative to the GDEmu. I just hope the developer opens the unit up to mass production in the future and it gets a price drop. I’d be very happy to get a second USB-GDRom for my arcade Dreamcast.
Neil – 8bitplus 2018
Recent Comments