
Review and closeup look at the ProGamer Supergun by Retroelectronik.com. How to setup, configure and get your arcade boards playing on a SCART TV.
What is a Supergun?
A Supergun is a device that easily allows you to play real arcade boards at home on a normal TV. Effectively it is a mini arcade cabinet. The origin of the name “Supergun” is hard to pin down, but I think it started with a Chinese company who marketed the first commercial device to play arcade PCB’s on a TV. The name Supergun stuck after their product and now all similar devices are called Superguns.
The Supergun needs to provide all the features of the cabinet condensed down to a small box or PCB. Including power input, video and audio out, test buttons and player controls. It also needs to connect to the game on a standard Jamma connection.
Jamma – stands for: Japan Amusement Machine and Marketing Association. This defines a standard for connecting games to the arcade cabinet.
This can start to get complicated with different arcade standards beyond Jamma, such as SNK’s MVS and Jamma+ used on Capcom CPS2/3. You always needs to know if your Supergun will be compatible with the games you want to play.
ProGamer Supergun
I was in the market for a Supergun. My CPS2 games all needed batteries changing and I wanted to test them out after they had been stored for quite some time.
After some research I settled on ProGamer Supergun from Retroelectronik.com.
")
|
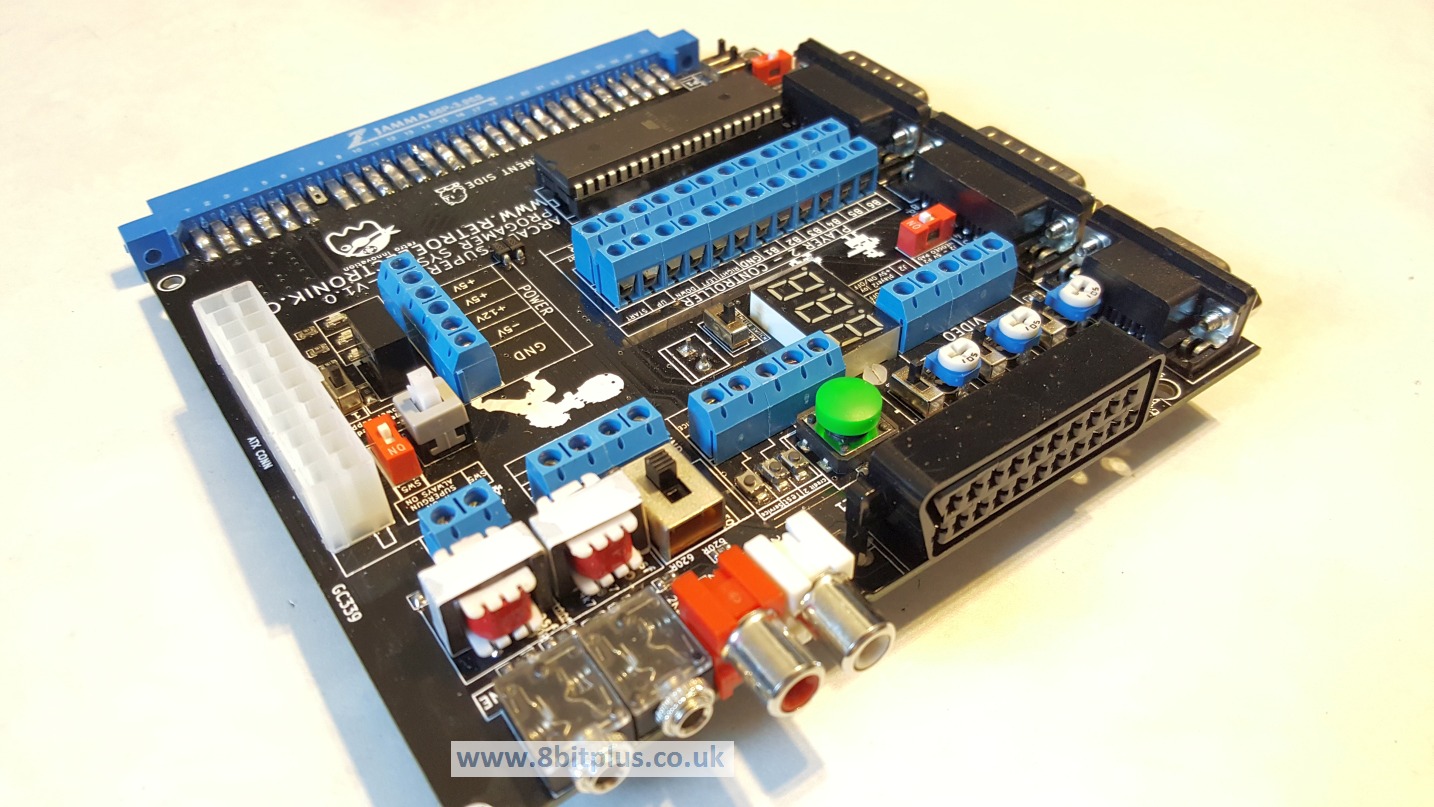
This is a Deluxe Supergun compared to other units you might find on eBay or Amazon. It has everything you could possibly need or want on a Supergun, and even things I wouldn’t have thought to include on-board.
Overall the board is of very high quality. It feels well constructed and seems to be using good quality components. The PCB is a pleasing dark colour which looks better than the standard greens or yellows you often see. The only down side is it makes it hard to follow the traces through the board when fault finding. I love the little graphic details in the overlay.
")
|
")
|
The Jamma connection is very well soldered in place but looks to be using a bit too much solder in my opinion. Also it has residue remaining from the solder flux.
")
|
")
|
On board switches are included for power, credit, test and service mode. No need to connect external cabinet switches for these, but with the inclusion of screw block connectors you can if you wish.
Controls for player 1 and 2 can either be connected to the two DB15 connectors, or the screw blocks if you want to connect an arcade panel.
Feature Highlight
Wide compatibility range. compatibly with Jamma, CPS1/2/3 systems, Jamma+, Neo-Geo MVS, and xxx-in-one cartridges.
6 buttons per player with Autofire. – Very handy to have the option configurable Autofire on any button or multiple buttons.
Multiple Audio Out options . Select from SCART audio, stereo phono RCA and amplified jack or headphone connections.
Kick Harness compatible. perfect for Capcom CPS1/2/3 games that need it.
ATX power connection with power button. PC ATX or Arcade PSU supported. 20 and 24 pin compatible.
RGB colour adjustment. adjustable colour pots, or can be set to automatic mode.
Voltmeter onboard. very handy to see the exact 12 and 5v feed from the PSU.
Jumper and Solderless config. Every option and configuration is provided by switches.
Optional connectors. All input/outputs from the board can connected to screw blocks or sockets.

|
The integrated volt meter is very useful, especially if you are using an Arcade PSU with adjustable voltages. A small switch next to the display allows you to switch between 12v and 5v for measuring.
Another feature I was pleased to see was the -5v generation. Older Jamma games may need -5 volts for their audio amplifiers, and many new ATX power supplies not longer output this negative voltage. The ProGamer Supergun can generate its own -5v, or take it from a PSU if available.
Setup and Testing
To test the ProGamer Supergun, I selected 3 different arcade game setups. Each needing slightly different control and audio configurations.
This includes: Neo-Geo MVS (4 slot), Jamma PCB game (R-Type II), Capcom CPS-2. My TV is a Sony Trinitron 20″ CRT with RGB scart connection.
For the control pad, I reused the ones I made a long time ago for my home made Supergun. The ProGamer Supergun uses a DB15 connector for each player with the following connection configuration.

|
It can also accept a Neo-Geo CD or AES controller, but they only have 4 action buttons.
For power is used a 450W ATX PC power supply.
Neo-Geo MVS (4 Slot)
The multi slot MVS systems use a similar connection scheme to Jamma, but with a few differences to the speaker lines to achieve stereo sound on the MVS cabinets. Changes also to the Test and Select buttons and removal of the -5V line. To safely use MVS system on a Jamma cab, an adapter is highly recommended. Lets see how the ProGamer Supergun performs.
")
|
")
|
I wanted to see how the ProGamer supergun handled the MVS stereo sound, and I’m pleased to say it worked well. The sound was just as good as from the MVS jack output. Audio switch needs to be set to Stereo for the Neo-Geo. Audio worked fine through the SCART too.
Jamma PCB game (R-Type II)
Next up for testing is my R-Type II game board. This is a relatively straight forward single game PCB. Jamma compatible and with mono sound.
")
|
")
|
")
|
No problems to report with this except it needed a few boots to get the game working due to its age. Controls, audio and video are working correctly. Simply plug and play with sound set to Mono.
Capcom CPS-2
Now to test a CPS2 board. The CPS2 is a Jamma+ compatible system. This means it will connect to the normal Jamma connection but makes use of an additional “Kick Harness” to provide 6 button compatibility over the original Jamma’s 3 buttons. The term “kick Harness” refers to the fact than Capcom routed the 3 punch buttons to the Jamma connector, and 3 kick buttons to the external Kick Harness.
The ProGamer Supergun allows for a kick harness to be connected, but needs wiring to a DB9 connector.

|
CPS2 will output Stereo sound, but only through its own un-amplified RCA connections on the motherboard. Through the Jamma connection only Mono sound is possible. I connected a pair of PC speakers to the Supergun and switched the audio mode switch to Mono.
With everything all hooked up, I could start the game. Everything worked well. No problems with sound and video.
")
|
")
|
")
|
Conclusion
This is a very good supergun. Having every option covered regarding connectivity is very useful. Also its wide compatibility is great to cover the various arcade standards without the need for adapters, especially for MVS systems.
The build quality is great and should prove reliable with any system its paired with. Perfect for board/game testing, or extended playing sessions.
The compatibility and flexibility claims are correct. The ProGamer Supergun had no issued with any hardware I connected (giving correct setting selected).
Another thing to note is that you could build a fully functional arcade machine around this supergun very easily.
The only negative point I can raise here is its complexity, and the almost overwhelming array of options and settings available. Some of the overlay text is a little confusing for first time supergun and arcade users.
As I mentioned, this is a deluxe supergun, and simpler options are available if needed. On the other hand, if you want a fully featured Supergun at a reasonable price, then this could be the one for you.
Thanks for reading.
Any questions? please add a comment below and I’ll get back to you.
8bitplus 2017
Hello!
Does anyone know where did the go? Is Fabien Weiss is a live? This was really awesome device and I can’t find replacement for it. Maybe someone could suggest some? To work with MVS JAMMA and other PCBs.
Hi guys. I have been after one of these Superguns for a while, just cant find one to save myself!.
Any ideas as to where to buy?. Thanks for the help….
Pete
great article. i just got one of these as i have a street fighter 2 board sitting in storage for the last 20 years…. i hooked it up and the board works which is great. but now i am thinking of getting a cabinet setup. have you any links to how i could setup arcade style joystick/buttons with this supergun ? Thanks
Hi,
thanks for the review, I purchased one of these on this and it’s a superb device. One question, I note that Smokemonster has said that some superguns have hot RGB connections (I assume he means higher voltage than a TV might expect) and also pass through speaker level audio passing through direct from the arcade board rather than attenuated line level audio such as you’d put into an amp or TV. He says this has caused damage.
Do you know whether the audio is attenuated for the progamer and whether the RGB is at a suitable level? I had no trouble with RGB on my TV but my board has an audio fault it seems (not -5v) so I can’t tell.
Thanks
I want to buy one for my Naomi and i am new to superguns. What SCRART did you use?
Also, what PSU did you use?
A link to the one i need to buy would be helpful.
Please and thank you!
Hi. I use a 400w psu and a normal scart to scart cable
SCART to SCART? i looks like its plugged into the front of the TV via RCA.
Sorry i am new to scart.
yeah it looks like that , but the front connection cables are plugged into another console and not used in that photo
Hi,
Finally I get video signal after changing the scart but the board is broken; video RAM error is shown.
I will buy other one hoping better luck…
Regards and thank you for your help!
Javier.
Hi,
Please, can you help me in order to use it with my MVS, I am trying but nothing works, no image and no sound… can you tell me the status of the switches please?
Regards and thank you,
Javier.
Hi. What MVS do you have? 1 slot Jamma board or the larger multiple slot type.
Does the MVS work at all?
Hi,
It is a MVS1FT with one slot and I hope it works.
Any idea?
Regards and thank you!
Javier.
Ok I think that’s a Jamma board, not MVS harness layout. Most of the 1F boards are Jamma.
Basically it should work. None of the setting switches will stop it working as far as I know. Mostly they relate to sound or controls. Set the Audio to Mono, but again that wont stop the video working. Are there any signs of life? TV flicker when turning the board on? Might be a faulty board.
Finally the board is broken; after change the scart to by a RGB one I got image in the TV but it is an error in the video memory.
Thank you for your help!
Regards,
Javier.
Thanks for the review.
I hadn’t really considered a Supergun before; I’ve run my MVS and Naomi collection through the same 15k monitor in my cab, but I guess this would allow me to use the Naomi’s high res mode.
I might just pick one up. They also do an adapter for Megadrive pads which should be useful.
Maybe I’ll even eventually sort some steering wheel solution for those Naomi driving games I’ve never played. And that one flight sim. Might be tricky though. :p