
Another recent purchase of mine was a second NEC PC Engine setup complete with CD-Rom2 and Interface unit. I already have the same system boxed in good condition, I got this one to keep out and actually play. So I don’t mind making a few improvements to this one.
My plan is to give this console a RGB port on the Interface unit. This way I can get true RGB picture from whatever PC Engine core system I plug into it.

|

|
Another job I’d like to try is to refurbish the CD-Rom2 drive with new caps, motor gear and laser unit if I can at some point.
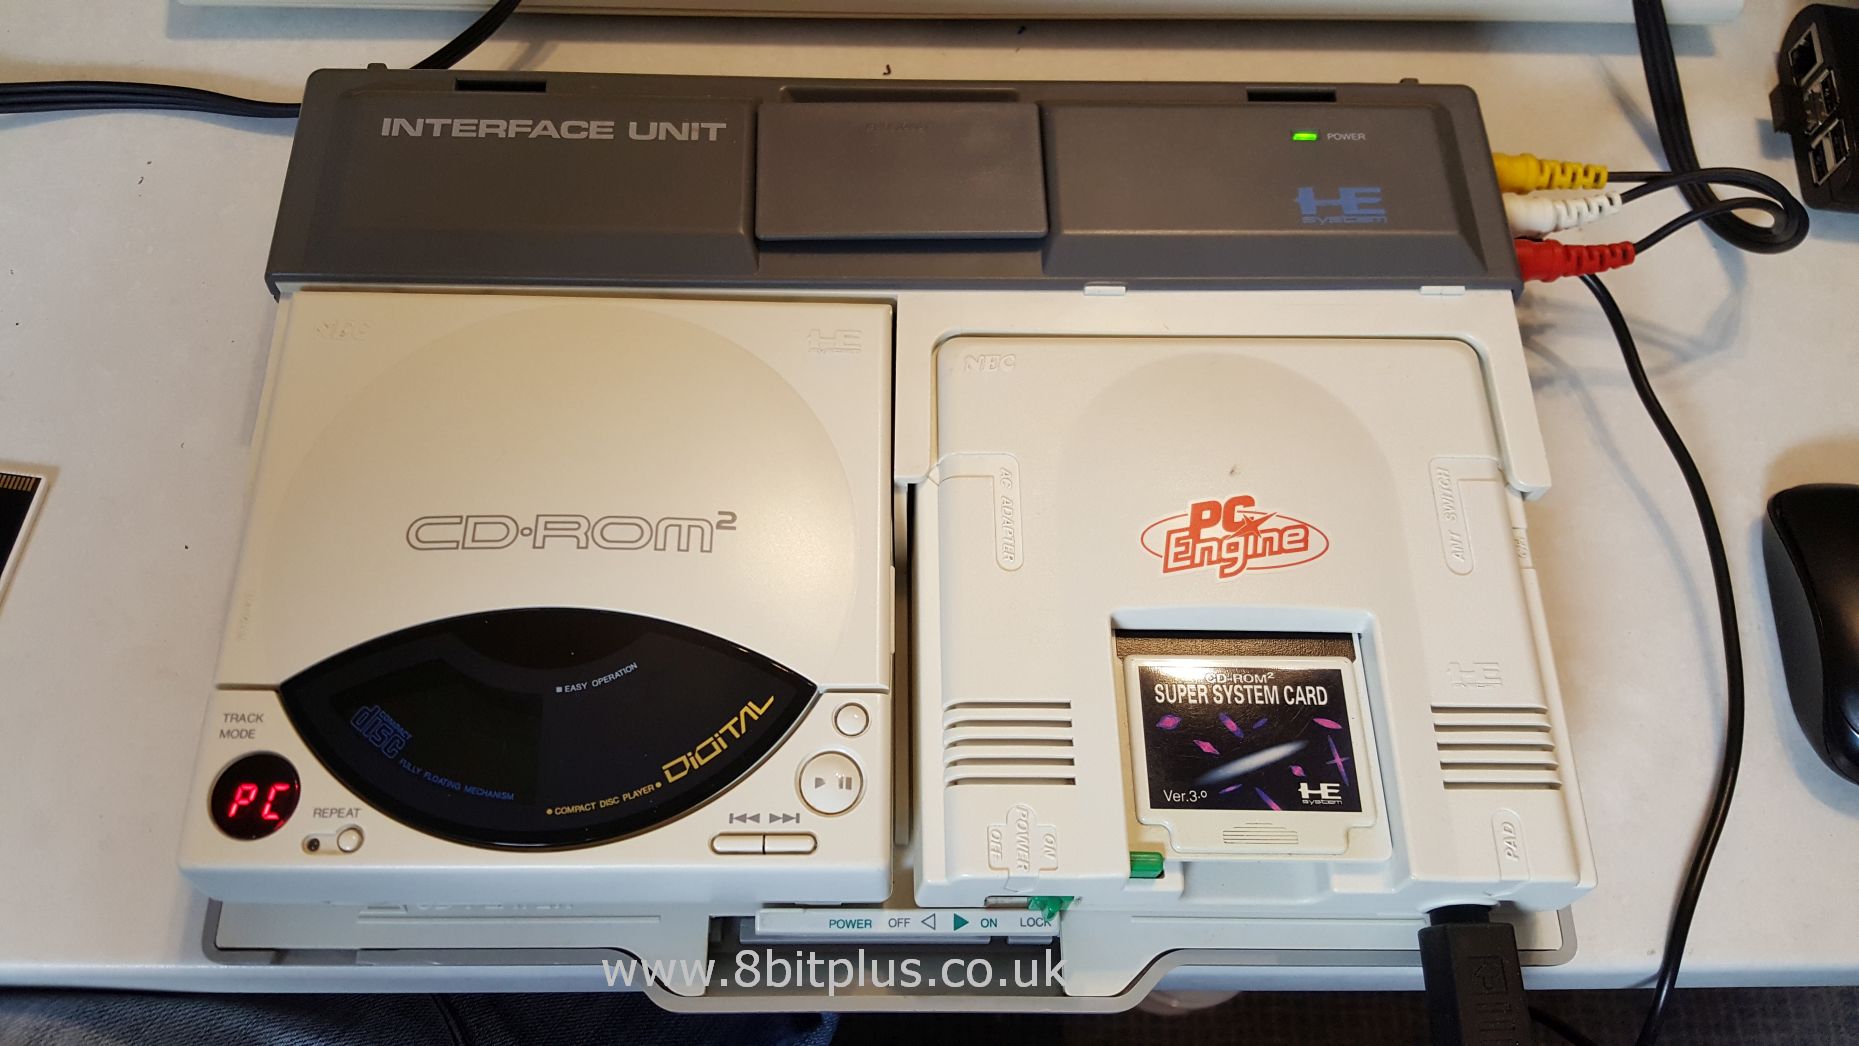
Interface Unit
The original PC Engine is a stand alone console. Its all you need to play the HU Card games. Unfortunately NEC decided to only include a RF video port on the unit, and route everything else through the large expansion port on the back. Later models like the Core Grafx included proper AV out.
When NEC designed a CD-Rom add-on for console they integrated composite video ports to the Interface Unit (a large tray to hold the console and CD-Rom2) but still no RGB AV port. Although I do like how it provides power to everything and only needs one PSU (Unlike MegaCD).

|

|
PC Engine RGB Mod
This project is very similar to my N64 RGB mod.
The RGB signal can be taken from the video processor, expansion pins or inside the Interface unit. I decided to do the latter as it wouldn’t require me to open the PC Engine console itself, and also allows me to switch the main system (to the Core Grafx for example) and still have RGB output.
Wherever you decide to get the RGB signal from you still need to amplify the signal as its too weak to attach directly to most TV or monitors.
After hunting around I found this schematic diagram for a RGB amp that was effective and recommended by Assemblergames forum members. I believe this was drawn up by forum member “micro” so full credit to him for this diagram.

|

|

|
To make things easier, I converted the schematic to a veroboard layout above and also included a list of the components needed. IC1 is a THS7314 which is a three channel amplifier. I got all the parts from www.bitsbox.co.uk and altogether cost less than £3.
If you don’t fancy building it yourself you can get a ready made RGB AMP from eBay, but be prepared to pay £20+.
Now for the best part, putting it all together.

|

|

|
The THS7314 is a SMD component and therefor needed an adapter to be used comfortably on a strip board. You could solder it on with wires if you want, but I recommend the SIO8 adapter.
Connection and Ports
Now that the video amp is complete I’ll wire it to the underside of the Interface unit board at the expansion connector. The photo below shows where I get the video, sync, and the audio signal.

|

|
Next I needed to install the AV port into the Interface unit. You can use any port type you like; Scart, Din8 (like Megadrive), D-Sub, DB9 or VGA ports all work fine.
My choice was to go with a DB9 (serial port) as I already had a plug and socket to hand. One tip to keep in mind is to take the audio from the AV ports and not from the PCE expansion port. This is because the CD audio gets mixed in before this point.

|

|
Lastly here is how I wired the port and made the custom RGB video cable.

|
no images were found |
Testing and results
What can I say…. Perfect.
")
|
")
|
")
|
")
|
Sharp, high colour and almost no noise. This mod has made the image much more solid compared to the washed out composite video. You can see pixel clarity has been improved. Well worth the time to get these results! I have to mention that I’m using a CRT TV and find it hard to accurately capture good quality screenshots with my camera. You have to take my word on the picture quality.
Thanks for reading.
Any questions?leave a comment below.
8bitplus 2016
Hi. Great post and really appreciate the work you do. My question is if I used the 9 din socket (like the one the genesis model 2 uses) would I be able to wire it up and use HD-retrovision cables with this?
Sure I don’t see why not. I cannot check though as I don’t have a Retrovision
Hi there, I’m intending to try this mod myself, but this is more ambitious than most mods I’ve done in the past (I’ve done mod chip installations and such but never done vero board stuff like this). I Was wondering if I could get some more information on the parts required? Mainly the capacitors, since there’s a lot to choose from and I’m not sure for instance how important the listed volts are and if I’m supposed to be getting polarised or non polarised parts. Also, can a 9-Pin Mini-DIN socket (like the Mega Drive 2 uses) be used for the new AV port, then allowing me to simply use a MD2 SCART cable? Thank you for any and all help.
Hi, Great job on your website – lots of informative and enjoyable content. I’m a new owner of the pc engine cd-rom2 interface unit. Can you recommend a suitable replacement UK power supply for it which can also power the original white rf pc engine unit too please? I understand that the console needs centre negative 9v 650ma and the interface unit requires centre negative 9v 1450ma – am I correct? I’m awaiting delivery of the interface unit from Japan – do they both share the same barrel jack connector size?
Any info would be greatly appreciated. Thanks.
Thank you for this very helpful article! One small thing, isn’t 220uf capacitor on scart pin 16 wrong way? + should be oriented towards source of the signal i think. 🙂
Of course, i was thinking of pin 20 aka Sync. 😀
I think you are right. I’ll try and adjust the diagram at some point. I bet I got it the right way round in the cable 🙂
Hello! Just want to say that this post has been invaluable to getting this mod done myself. Looking forward to reading your previous articles and mroe posts.
Just a quick question, may I know how you were able to remove the upper white plastic piece of the IFU-30? I’d like to retrobrite mine, but I can’t figure out how to take it out!
Hi Paul. Thing is the unit had been opened at some point in the past and I found it very easy to open. There was a few broken plastic clips missing so that might be why.
Ohh, that explains a lot then. I noticed from your picture that there seemed no easy way to lift the entire thing without a clip impeding it.
Thanks for your quick reply!
Hi, I lost my video cable DB9 to Scart, where can I get this cable, I been searching for very long time in internet and couldn’t find it. Or do they even have DB9 to HDMI?
Many Thanks for your help!
Hi, I’m looking for video cable, I also have the DB9 and wants to connect ot TV but I can’t find it anywhere to buy, I see you got the same DB9. Where can I get RGB video cable like your one?
Many Thanks in advanced!
PC-Engine is also my first console and I just want to get it running again, but I somehow lost the cable while movie home.
Thanks mate!
Hi. Sorry but I cannot make a cable for you. I have no way of accepting a payment. Also the pinout might be different to the ones I use.
Hi, Sorry I didn’t see the comment and I write one again.
Thanks for replying so fast!
You got me any advice how to advance? I really want to make it work again.
Hi, I’m looking for the pin layout for original av connector 8 pin. I need the cable color for each pin of the round connector.
Many thanks.
Looking great, and a very informative post! Got myself an old Turbo Duo we imported from the USA back in the 90’s (I live in Sweden) that I’m gonna have modded with RGB one of these days. That is, if it will ever live again, hopefully i just need to recap it.
Keep up the good work!
Hi. Feel free to get in contact with me for a recap and rgb mod. I regularly do this and have a quick turn around for those jobs. Neil