My conversion of the Sega Mega Drive to operate in a Jamma Arcade cabinet. Jammadrive project.
Sega produced some of the most memorable and lasting arcade games of the late 80s and early 90s. True to its design Sega ported a huge back catalogue of arcade games over to the home Sega Mega Drive console. Years later and playing arcade games has become a hobby in its self. Many enthusiasts own and build arcade cabinets to house a PC for Mame and other emulators in addition to playing the original arcade PCBs.
Unfortunately many Sega arcade PCBs are very hard to find and can be very costly. Also some are not Jamma compatible and would require a dedicated cabinet to run, Afterburner for example.
Sega Mega Drive arcade conversion
This project is to convert a standard Sega Mega Drive console to operate in a Jamma standard cabinet.
I can’t take all the credit for this mod because its’s been done before at www.arcade-system.com. I basically used his guide as a template while making a couple of changes. This is just a basic overview of the job.
Main components:
1x Original Sega Mega Drive console.
2x Control pads (3 button version).
1x 56pin Jamma connection board
1x small peice of vara board (12 x 5 holes is plenty).
1x Voltage regulator 78s09
1x polyester type capacitor 0.33mf.
1x polyester type capacitor 0.10mf.
1x switch for 50/60hz video mod *optional.
Lots of light duty component wire, Different colours help too.
A good place to get all the electrical stuff is Maplin or Rapid. You can pick up a Megadrive on eBay for a few pounds including controllers and games.
For the Jamma board I highly recommend one from Jammaboards.com. The one I used for this is the Jamma Fingerboard JB-1 Adapter.
Power:
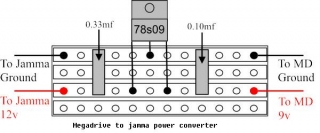
First thing is to make the power converter circuit. This converts the power down from 12v to 9v. Some early Sega Mega Drive consoles are rated at 10v. This is the model I have used. When finished solder the input wires to the Jamma board 12v and ground.
The voltage regulator has a screw hole in the top, I used this to secure the board to the Megadrives metal heat plate.
Video and Audio:
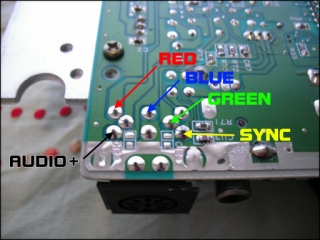
Now we look at the under side of the motherboard at the video socket.
This photo on the left shows the solder points for the video pins in the socket. I soldered directly under the board as apposed to using a plug in the socket.
The photo on the right shows the end result with the RGB, Audio, Sync and Ground all soldered to the Jamma edge.
Once the Video and Power wires are connected its a good time to test it out.
I grabbed a copy of Super Smash T.V and as you see it works great.
Controls:
When you get the pad stripped right down you’ll see that the wire points are all numbered with the corresponding pin on the motherboard.
All I did here is solder a wire from the pad to the underside of the controller port .
Final Photos
This was a very small low cost project due to not heeding much hardware, but quite rewarding when done.
Some time I’ll design a case to put the board into. I’ll update with more pictures if I do.
Playing the Jammadrive is a great alternative to tracking down rare and expensive PCBs. It also has a much better feeling than just emulating the games on a PC.
It also gives a new way to play none arcade games like Gunstar Heros in my Video. Its a lot more involving than a joypad.
Video of the Sega Mega Drive arcade board in Jamma cabinet
Thanks for looking
Neil – 8bitplus 2009
ProGamer Supergun review here at 8bitplus


great job; one question; is that picture of the power picture correct; straight through on the three lines?
Hi Stu. Its only 2 lines. Not the best diagram, sorry. There should also be a cut right in the middel of the power line, between the legs of the voltage regulator. Otherwise it woul just be 12v out. Missed that on the diagram. I’ll edit it one day.