
This isn’t really a new project to me, its been in the works for a while now between other things like my Laserdisc collection and arcade machine restorations. Since I already had a PPC tower system to run OS4 on, I wasted to build a powered up desktop system in its original desktop case.
8bitplus Amiga 1200 Desktop Specifications:
| CPU | 68k 68040 (33Mhz) |
| CPU | PPC 603e (166mhz) |
| Motherboard | Version revision 1B |
| Chipset/Graphics | AGA |
| RAM | 64mb fast ram + 2mb original chip ram |
| Hard Drive | 30Gb Toshiba 2.5″ |
| Optical Drive | Sony DVD-RW Laptop slim drive |
| Accessories | Indivision AGA for Amiga 1200, Subway USB, IDE-Fix adaptor. D-Link netword card. |
The whole point of towering an Amiga is to increase the amount of available space for upgrades. When upgrading in the standard case a whole new set of challenges arise. Firstly the reduced space. Especially when considering optical drives and the extra wiring, but also the increased power requirements. The PPC card already maxis out the original 15w PSU on its own. There is definitely no room in there for a newer PSU (except possibly one for a nano ITX system), Any power solution would have to stay external.
More Power

|

|

|
There is plenty of documentation regarding powering the Amiga 1200 from a PC AT or ATX PSU. This provides the Amiga 1200 with a much higher wattage and is much more stable than the original on an upgraded system. The only problem in stopping there is that the power for each device is still coming from the A1200 motherboard. In my custom system I have linked power from the floppy drive, hard drive and CD-Rom to another port on the back of the case. I then made a cable to link this port to the ATX ample supply of 12v and 5v. I also linked up extra power to original floppy power port to supply a bit of a voltage boost to the system , this is recommended for systems with high powered accelerator cards.
VGA Output

|

|
The next addition to the system is the Invision AGA card. This is a small card than clamps on to the motherboard and intercepts the RGB video signal, then increases the scan rate and de-interlaces the picture for output on a VGA. This a great piece of kit, all the Amiga screen-modes and resolutions work perfectly on my TFT screen. The games look great, and its much more convenient than having a 15hz RGB monitor on the desk. I ran the VGA port to the back of the case and under the floppy drive, and made a gap for the port in the spare port area.
USB

|

|

|
Another great addition I made to this machine is the Subway USB controller. It connects the “Clock Port” on the Amiga 1200 motherboard. Commodore original added the port to allow a real time clock to be added as an upgrade, but as this was incorporated into 99% of all accelerator cards the port went largely unused until late in the A1200 life. It was found that the clock port could be used to access the system bus and could be opened up to much wider use than just time keeping. A wide rage of upgrades were produced to take advantage of this like; Parallel and serial controllers, 16bit sound cards, MP3 decoders and USB controllers.
The Subway is controlled by software system called Poseidon. A large variety of USB devices can be used in Workbench like; Memory sticks, Mice/Keyboards, CD-Rom/Floppy/Zip drives, Digital camera, Printers and even network cards. The USB Speeds are quite good for small files and it seems to be fairly stable.
Network and Internet

|

|

|
It would surprise many people to know that the Amiga 1200 can connect to the internet. In the 90′s the most accepted method was to use a serial modem for dial-up, now the best way is to use a LAN card. For a system without PCI ports for a LAN card the only way around this is to use the PCMCIA card port. This is a 16bit port and very slow compared to the one on most laptops now, but in the early 90′s it was a fast and convenient way of adding devices to the Amiga.
I’m using a D-Link DFE-670TXD, which supports the Amiga 1200 16bit cardbus. Amiga OS has no built-in TCP-IP stack and relies on an extra program to fill that role. I use Genesis, a custom version of AmiTCP. Connecting to a router is very easy, just assign a IP address and a gateway, point it to the card driver and your online. I use Ibrowse as the browser, its rather outdated compared to what you’d expect from Firefox now. Its not got any support for style sheets, Flash or Shockwave and only basic Java, but for lots of sites it works quite well. Just don’t expect to get on YouTube or Facebook.
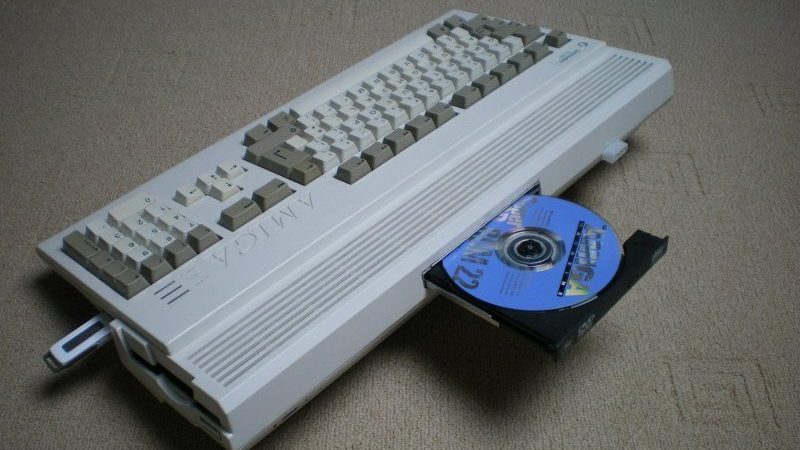
Internal CD-Rom Drive

|

|
Another thing I wanted to achieve was the inclusion of a DVD or CD-Rom to the Amiga. This is very easy to do in a tower system, but so for the desktop version. Years ago I had a 10x speed external CD-Rom drive for my Amiga. It was huge, noisy and very expensive. It also connected on the PCMCIA interface.
This time I used an IDE-Fix adapter to connect both the HDD and a laptop style DVD-Rom drive. The drive was mounted in a customized holder from an ITX case and the HDD was held in place with Velcro pads.
I then cut a section out of the back of the case for the drive.

|

|

|
Games and Music

|

|
Games and music.. 2 things the Amiga are best known for. If you remember having to chain load piles of 880k floppy disks to load up a game of Simon the Sorcerer, or any number of large Amiga games then you’ll love WHDLoad. Nowadays, with access to cheep hard drives you can install WHDLoad copy’s of all your favourite games and never touch a floppy disk again. All the games load much faster and you can exit back to Workbench from most as well.
MOD files sound great when playing from a real Amiga. The sound is rich and sharp, you just have to hear it. Eagle player is a nice little program for playing many “chip tune” music files. There’s plenty of free MOD’s on Aminet. An expanded Amiga 1200 like mine can playback MP3′s, but only at a reduced rate because of the CPU load.
Final Notes

|

|

|
The Amiga 1200 is a nice little computer. Its great fun to play about with and very nostalgic for me as it was the first computer system I had to expanded and upgrade for my self. Long gone are the days of using it as a serious PC, but there is lots of life left in there to be enjoyed.
Its a fast computer, it boots in seconds and shuts down when you turn the power off. The expansion possibility’s of this little machine are staggering and its easy to see why it has such a large following.
I have a few more things I’d like to add to the machine, SD card reader and a Blizvision graphic card for example.
I’ll be sure to update here with anything else I add in the future. Thanks for looking and feel free to ask any questions about this project. Neil -8bitplus 2010.
I’m sorry but the Molex connector on the back is a stupid idea, ruining a good case.
The Amiga power connectors pins are thick enaught to stand that current anyways, you could just have taken the power from the female connector pins inside the case, I mean, you’re using a ATX PSU anyways, there was no need for a separate connector.
Ok good point. Nothing I can do about it now and the person I sold it to was happy with that solution. the case was not in “perfect” condition to start with or I wouldn’t have wanted to cut anything.
Hi, nice modding – it’s amazing what you’ve been able to cram in! As a beginner I’m about to attempt something much more modest. The Indivision doesn’t allow the installation of a HD cradle – am I right in assuming that you have your HD to the left of the Indivision and is shown in the pictures above covered by the IDE ribbon cable? I might investigate fixing a HD to the underside of the keyboard with Velcro pads
Hi Simon. You are correct. With the Indivision AGA, the HDD needed to be relocated.
In the first version the HDD was located in the top left corner.
In the second version it was located under the slot loading CD drive.
http://8bitplus.co.uk/projects/amiga-1200-desktop-upgrade-version-2-2011/
The DVD drive and the LAN card dont look to be period correct for this Amiga, how do you feel about modding classic computers with parts that weren’t available when they were still being used in Anger? Nice 1200 btw
The LAN Card is not a mod, just an accessory.
As for the CD/DVD, it was convenient to have it on-board rather than in a huge external drive unit like I had back in the day.