
This page details work on a PC Engine Duo send in by Ian for replacement of its original capacitors. Also to fix a problem with the sound system. Firstly I tested the console out before starting any work and was able to confirm the quality of the audio got lower as it was powered on for around 30 minutes. The Volume was also on the low side.
")
|
")
|
")
|
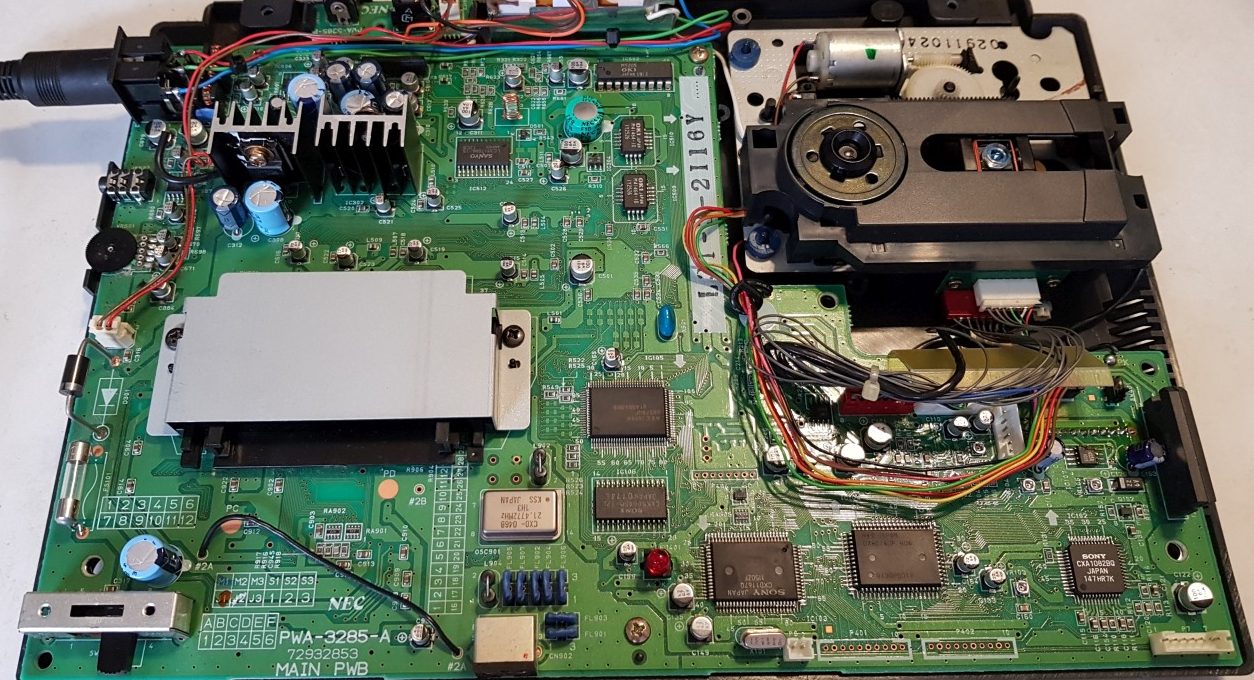
Upon opening the case I could see the usual failing capacitors in the audio and power systems. As you can see there was some very nasty corrosion around the capacitors solder joints, and damage to traces and via’s. One area next to the LED and the CD signal processor was in a very poor state. The PCB’s protective lacquer coating had been compromised and started to flake off.
")
|
Re-Cap Work
The first job here is a complete replacement of all the original caps. As I’ve mentioned many times the PCE Duo is a nest for bad caps and I always change every last one. Once the cap is removed I then remove as much of the original solder as possible as it may be compromised and less effective.
")
|
")
|
")
|
The area around the LED and CD processor cleaned up nicely. I had to remove all the flaking lacquer. Then I coated the exposed copper with solder. When I’ve finished with the recapping I’ll then coat this area in a clear coat lacquer covering to protect it from atmospheric moisture. Thankfully the solder pads are still in very good condition and should not be a problem when installing the new capacitors.

|
")
|
Audio Problems
The Duo has a very complicated sound system and relies on a number of OP-Amp IC chips and multiple sound sources. I have found that sometimes leaking fluid from capacitors can make its way under these IC’s and cause them to short out. Its best to remove and clean the board under the OP-Amp chips. I then replace with new ones. The Texas Instruments RC4558D is a good replacement for the unbranded ones used by NEC originally.
")
|
")
|
")
|
The OpAmp at IC503 (underside of the board) is clearly affected by the leaking capacitors on the other side. This dual input amp is responsible for amplifying ADPCM sound effects and passing them to volume balancing chip. When the chip was removed I could tell it was trapping leaked gunk. I then cleaned and replaced with a new chip. Its not worth reusing the old chip in this case.
The tiny holes between the two PCB sides (called Via’s) can actually allow the leaked fluid to pass through allowing the damage to spread further. The via will often stop being conductive when this happens, leading to power loss in another part of the audio system.
TIP – A good tip for locating bad via’s. Place your board over a bright light (like you smartphone torch). If light passes through the via then it should be fine. If it stays dark then the inside of the via passage is full of corrosion.
")
|
")
|
")
|
The other amp to be replaced is located at IC506. This chip is the main audio amplifier for the Hu-card game system and outputs to the AV port. Again it was holding an amount of corrosive gunk underneath and I replaced with a brand new part after cleaning. This amp is also known to be affected by heat emitted from the voltage converters. Great move of NEC to place the power and audio systems on top of each other, nice one.
Reassemble and testing
Now that I’m happy that everything is looking as it should, it’s time to test it out. First I played Bomber Man ’94. I got the system fully warmed up and this time didn’t experience the drop in volume or sound crackling. Next I played an audio CD from start to finish checking that the laser head can travel from the inside to outside of the disc. No problems at all, the music sounded good and at a good volume.

|
")
|
Next I played a CD-R copy of Gate of Thunder. This game tests all aspects of the console. PC-Engine sound affects, CD streaming music and ADPCM sound affects for the voices. Another good game to test with is Ys III. It used plenty of ADCPM generated speech.
Other Work
The only other things that needed doing was to apply the clear coat lacquer to the damaged PCB section as highlighted above.
Also I placed layers of electrical tape under the CD balancing pads to raise the CD mechanism up by 1 or 2 mm as the owner had reported CD’s scratching on the case.
Lastly before sending it back I’ll switch the video sync signal from composite sync to RGB-Syn directly from the CPU. This should improve the picture output on RGB screens, at the cost of using composite cables.
If you have any questions, please ask below.
Or If you have a PC Engine console in need of new caps or other fixes, please get in contact here.
Thanks for reading.
8bitplus 2017
I fixed another with no CDDA CD audio by repairing a via from Q606 on the bottom side. It isn’t on the partial audio schematic from Furrtek so I’m not sure how it’s related to CDDA.
Symptom: Seemingly no CD audio, though it was *barely* perceptible through the right channel only using headphones (volume cranked). If you just use Genesis 1/Mega Drive 1 cables to test like I was at first then you have no right channel audio anyway.
Did you ever figure this out? Same issue here. Loud beep instead of playing the sound effect.
Hello Jarod
If you’re still looking for a fix I had the exact symptoms after recapping my PCE Duo. In Rondo of Blood the ‘X’ sound at the title was a loud beep, same when Richter whips the horses and defeating skeletons in the first stage. Also the graphics were corrupted during the first cutscene after Richter is supposed to whip the first skeleton.
I found a broken trace caused by component L503 being broken near the D91317GD on the bottom of the board. I can’t find any documentation but I saw similar component L504 on the top side of the board had continuity. So I’ve cleared and bridged the pads for L503 and now the ADPCM samples and cutscene graphics are working.
If L503 is OK, maybe this will help point you in the right direction, this took me a good while to spot.
Hi
I have replaced most of the capacitors, but still getting little CD volume. Then I tried to lift IC503 and IC521 for some cleaning. Well all sounds gone after reassembling. After checking the board I found a lot of bad vias I think. Should I now get some new 4558s or just try to do something with bad vias first?
Thank you so much
Hi
How did you managed to remove the C136 and C163 capacitors as they are coverd by a chip on the other side. ???
I am having trouble figuring that out
Hello. Yes I always replace those 2 caps. The chip can be bent back giving access to the solder points. Never had a problem with C136 & 163.
Hi!
I have a turbo duo and any time I turn it on I just got a black screen. Do you think capacitor replacement may help?
Thanks a lot!
Yes, it is a surface mount cap, it goes up to IC506, reason I say it belongs on the audio circuit.
Ic 506 is the main audio opamp before going to the AV port. I don’t have a duo board easily accessable just now. What pin is it connected to on the ic?
Thanks for the help, C624 -> R631 -> Pin2 Ic506
Perfect. Pin 2 is left audio in from the main sound processor. The cap and resistor will be for very low value for smoothing the voltage. It’s not for powering the ic as I suspected. Try a 1uf cap to be safe.
If pin2 is left audio, using that information I searched for right audio. Pin6,correct? same cap in the right channel, C625.
I desoldered it, measures 22nf, is that a good value? Can you tell me the voltage rating?
Thanks
Hi there,
I was doing a recap and by mistake I trashed C624, it looks it it belongs to the audio circuit,
but i’m not sure, does anyone know the specs for this cap?
Thanks
It’s not on my diagrams as being part of the audio system. I’d leave it off and finish the rest. Then if the audio is not working, try bridging the cap. Is it a surface mount cap?
Hey. I realize this is an old post, but still very useful today.
I’m currently working on a Turboduo that I’ve recapped, replaced all 4558 Op-Amps, thoroughly cleaned the board like 3 times(had popping and crackling sounds), reflowed much of the solder points and IC pins, and found 3 bad vias/traces.
The last issue I’m noticing, is with playing Fighting Street as a test cd, the cd audio(music) starts low and fades in to a normal loud volume. While playing “round 1” and the music is normal and loud, then when Round 2 starts, the music starts up again at a lower volume. same with anytime the audio track changes or restarts (the short continue screen).
Any idea what could cause this? OR have you seen this specific issue? The audio sounds good otherwise and once it has time to fade in to full volume it sounds good…
Hello !
Thank you for your article.
I have donne the same than you a good recap and changed the 2 amps.
Unfortunately without success.
I have the sound of hu-card only on the right speaker and no sound on CD games. Only the sound effect, no music.
Have you any clew ?
I seen other amps on the motherboard. Is there a chance to repair it ?
Thank you for your response.
Hi. You have to go through the whole apllifier system and check connectivity. Even if the capacitor pads are nice and clean, the interconnectivity between the 2 sides of the board might have gone in some places. Email me and I’ll try to help out.
I never post in forums, but you save me 2 cd readers (pc engine duo r, ps1) with the trick of the layers of electrical tape under the CD balancing pads to raise the CD mechanism. It realy work! and dont need calibrate the laser disk (in my case).
Now, i have problem with some sounds (music work fine), but some sounds (like the door in the “press star” in castlevania ROB) have a bad sound like “interference”.i will try recap later.
THANK YOU SO MUCH!
Did you ever figure out the fix for the creaking door sound? I have a PCE-D with the same issue. It instead makes a loud beeping sound for the creaking door and some other sounds.
Where is this trick?
Hello! I have Duo RX and I’m missing audio effects such as the creaking door in rondo of blood or the slash sound when X appears in title screen.
Is this related to caps? I’ve analyzed the board and everything looks great.
Any help is appreciated.
I also had low CD audio volume with occasional pops.
I removed IC504 (4053 audio multiplexer) to check the vias underneath and then reflowed the two 4558 OP amp ICs at IC503 and IC521. Suddenly, I had no CD audio at all.
Reading that IC503 and IC521 are heat-sensitive, I replaced them using the lowest heat setting I could get away with and still had no CD audio. I verified that pins 9, 10, and 11 of IC504 have continuity with pin 81 of the large NEC QFP chip on the bottom (near the CD ROM drive) but the trace on the top side looked corroded. I removed the solder mask from the corroded trace and tinned it which suddenly restored CD audio completely and at seemingly full volume.
Hi there
I have got a pic engine duo with sound issues,the sound is very very low I change de capacitors and still the same.
My question is the amps for ic503 and ic 506 are the same Texas Instruments?
Thanks for all
Those are ADPCM sound effects (digitized audio). IC503 and the nearby DIP chip handle that so make sure all the connections are good and check ground, voltage, etc. Should be about 7.3-7.8v on pin 8 of IC503.