
Recently I was lucky enough to get hold of an SNK Neo-Geo CDZ console at a very good price. After a long time of looking at the various SNK systems that I am interested in collecting, the most affordable by a long way is the CD systems. The games are for the most part identical to play as the AEG or MVS versions except for a long load time and for some games the bonus of a CD sound track.

|
When it came to the testing I was disappointed to find that one of the controllers had defective contact switches in the D-pad. I dismantled the pad and attempted to clean the contacts, but I still couldn’t make it work. Apparently this is a rather common problem with the Neo-Geo CD pads, I didn’t fancy my chances of finding another fully working one any time soon.
I was following a guide from Gamesx.com, which has lots of good info regarding this problem
I decided that I would rebuild the pad in the form of an arcade board, useing arcade buttons and real joystick.
After a short search I found a site that had the parts. http://www.gremlinsolutions.co.uk

|
Parts Needed:
1x Sanwa Bat Top Joystick
6x IL Pushbuttons (2x Black, 1x Red, 1x Yellow, 1x Green, 1x Blue)
All the buttons and the joystick came with the microswithces included.
At first I was going to construct a case out of wood, but I knew that metal would give a much better feel and finish.

|
I finally found the perfect case for the job, It came from a Unisys Aquanta mini PC. This tiny computer had a four sided removable shell. It was designed to allow you to remove the computer from the case without having to move a heavy monitor first, very handy.

|
I created a design template of the project in Serif and using that marked the drill holes.
To get through the computer case I used a 32mm hole cutter with a 24v drill, it went through in no time. Then I used a Dermal to remove the sharp edges.

|
Between working on the case I started stripping the controller PCB down. I was pleased to see how simple the board was. The best thing was that this pad used no logic chips like you would see on later designed pads like Saturn and Playstation.
Using a knife I scratched off the black contact pads of the buttons to expose a copper area to solder onto.
Before I went any further I tested that this theory would work. I plugged in the striped down pad and started up the console and using a small piece of bent wire I tested each contact and watched the movement on the screen. All was working fine. I soldered on the wires and crimped on spade connecters at the other end.
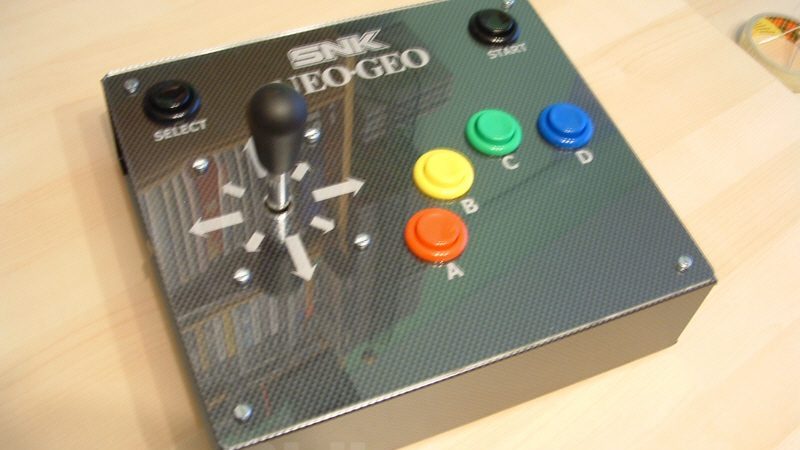
The drilled case was covered in carbon-fiber texture affect paper. Finally I wanted to make a clear plastic top for the board. To do this I used the design template I created earlier and made use of the laser cutter at work. For the final affect I etched the SNK and Neo-Geo logo onto the clear plastic as well as the direction arrows and button labels. The laser cutting and etching was all done with the design flipped horizontally, this was so when it was finished and placed the right way round it has no rough areas from the laser. I also gives the etching a nice deep look.

|
I have tested this new Arcade board with a few games and it seems to perform very well. It works best in the topdown shooters like Sonic Wings and Ghost Pilots. The joystick is smooth and nimble with a satisfying movement range, just great for pulling off the super moves in King of Fighters or Samurai Spirits.
Well worth the effort to create something fun and personalized as appose to hunting down a working pad or joystick on ebay
-Neil 06-01-08
Recent Comments