
Intro
Its time for me to replace the security batteries in my CPS-2 games so I decided to make a little article following the process and providing a bit of background on it.

|
Capcom CPS-2 is one of the all time greatest name in arcade history. The speed, colours and huge animated sprites are just unbeatable. The only problem is no matter how well you look after them, play them and keep them safe, they can die! just like that. The worst part of the deal is that its by design, Capcom built in a system that gives the game a limited life.
The reason for this is not exactly clear but the most likely reasons could be:
Piracy
which was a bit of a problem on the original CPS boards. Just look how many pirate copies of Street Fighter II are out there. All the game ROM’s are encrypted. If they are “dumped” then the data is useless without the code needed to decrypt it. The code is held alive by the battery, when it runs out of power then the code is lost and the game wold work.
Continued profit
Capcom used to be able to reprogram and repair the game boards for a cost. They even offered the battery replacement as a service to keep the game under warranty. Remember that these game could be VERY expensive and valuable to the arcade operator who owned them so they had to pay to keep them going.
Solutions
The first and by far the easiest solution is to replace the battery your self. Its fairly safe and simple to do, and for only a little cost keeps your game going for up to 5 years. This is only any good if the game is in good working order. By that I mean before the game dies.
The other solution is to reprogram the game ROMs with an unencrypted version of the game. This is not easy, requires programming knowledge and special hardware. If the game is dead, unfortunately its the only option. Lucky though The guy at CPS-2 Shock can bring your game back from the ashes in a process he calls “Phoenixing” a Phoenix CPS-2 game needs no battery and will work forever hopefully.
Lets do this!
I ordered a set of new batteries from Jammaboards. They are based in the US ans it took about 2 weeks to get here to the UK. The first thing to check is the age of the battery. Even though its new you don’t want ones that have sat around for years before you get them. As you can see it was make FEB 2012. Very good.

|

|
To get the game open remove the screws with a Trox T-20 screwdriver. There should be 4 main screws and possibly a larger bolt to remove.

|

|

|
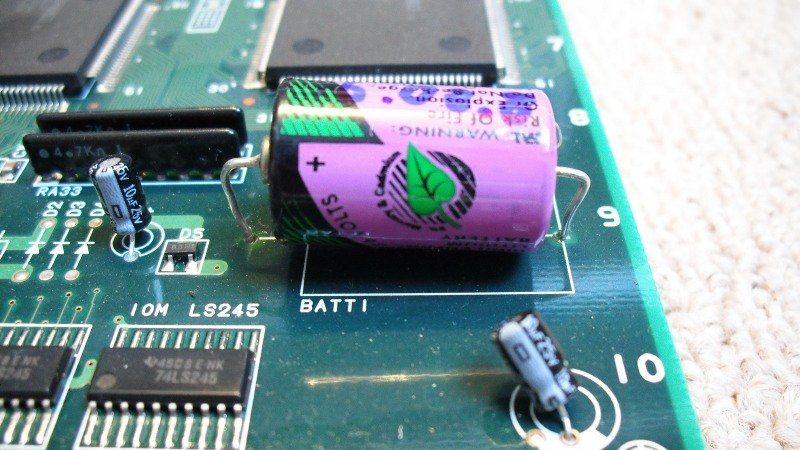
Carefully remove the the PCB from the lover part of the case and place on a static free surface. Locate the battery in the top right corner, flip the board over and unsolder the battery legs. Be careful not to over heat the PCB tracks, you don’t want to burn them or lift them from the board. They are fairly thick and strong and should be fine to replace the battery many times in the future, but still be careful.

|

|

|
Unfold the legs on the new battery. As you might see, I marked the board to show the positive and negative terminals and as you might guess, it needs to go in the right way round. The positive points into the board and the negative points to the outer edge. Slot the legs through and solder it in place. Trim the excess leg off and your done. Easy as that.
Reassemble the game and give it a good testing. Now you can relax as your game can live another 4 or 5 years.
I have seen other guides that use a second battery as a “helper” when changing the original battery. The theory is that a second battery provides power to the board while the old one is replaced. This is all fine but the code will stay in game board for a short while when the battery is removed. Some people even say it would last between 5 minutes to 1 hour after the battery is removed. This should be ample time to do the change over, I think it takes me about 15 seconds to get the new one in. I have done this lots of times and never had a problem, but if you don’t feel its safe then hook up another battery from a spare ground to the underside of D4 by the positives solder point.
Thanks for reading and feel free to leave any comments. Neil 8bitplus
Recent Comments